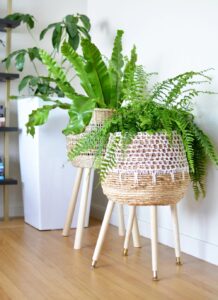
I love combining textures and living plants in any space. After moving an indoor tree away from my ladder shelves in my studio, to fill that corner I wanted large tiered planters – rather than buying them I made my own by propping up woven baskets on wood table legs and attaching them with screws to a wooden disc inside.
Lowes has table leg aisles (similar to this DIY project) where they also sell round wood circles, prompting me to think of making these basket plant stands by using these wooden circles as bases (a basic wood stand would also work). I could easily have attached these table legs directly onto them as I originally intended (but instead hid them inside a basket instead), with all supplies and steps listed below for making these easy woven basket plant stands!
Begin by gathering all your materials. I used two baskets from World Market (a small harper macrame basket and dakota basket), four 27.5″ tapered legs from Lowes, two 12″ birch circles from Lowes, 1 3/4″ wood screws, a drill with drill bits, mitre saw clamp, cotton cord (optional), gold spray paint as needed and spray painting equipment for this project.
I added a few stripes of cotton cord to the plain basket to complement the macrame string on another basket – an optional step.
Mark 16″ from the bottom on each table leg to create two plant stands with different legs from just one 27-5″ table leg.
To achieve the mid mod leg look with angled supporting legs, cut 27.5″ tapered wood legs at 80 degrees (10 degrees off of 90). This first cut creates two legs of different sizes – 16″ and 11.5″ respectively.
The bottom smaller leg features an adjustable metal foot that sits flush against the floor despite having been cut at an 80-degree angle.
The taller leg must be cut at an 80-degree angle from its base, using the miter saw, so its top matches its base. Use of miter saw allows users to shave away at its lower part so the 80 degree angle at both top and bottom match up perfectly.
With your 12″ wood circle, create a cross shape and drill pilot holes 3/4″ from its edges. Clamping it securely to a surface makes this step fast and straightforward.
Drill vertical straight pilot holes (not at the same angle as each leg) to connect them to the disc through the basket.
Place the wood circle at the base of the basket, and fasten each leg to it using 1 3/4-inch wood screws. After being secured to the wooden disc, some legs of your plant stand may tilt one way or the other – adjust them so all four sit flat on the floor!


